SDB:Create a Live USB stick using Windows
tagline: From openSUSE
Download ImageWriter
Download the SUSE Studio ImageWriter
Write ISO to USB
Write the LiveCD to the USB stick.
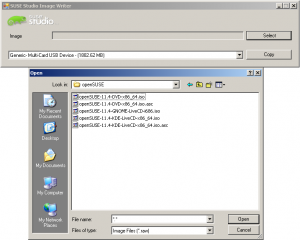
NOTE: Windows Imagewriter.exe, unlike Linux version, does not see automatically .iso files, only .raw, but it works with any of those files without problems. That leads to manual selection described below.
- Open the downloaded ImageWriter
- If the ImageWriter won't open, you'll probably need to download the .NET 2.0 Runtime
- If you get an error right after you start the process, you may want to right-click the executable and "Run as administrator".
- Press the select button
- Type
*.*in the file name box and find your LiveCD image - Select your USB stick and click the Write button
NOTE: You may meet this error on some MS Windows versions:
- If you have done above steps correctly but still get error like this
system.componentModel.Win32Exception:Access is denied
try one or more of the following three:- An opening Windows Explorer might have blocked direct accessing to a physical drive. If you opened the ImageWriter from a Windows Explorer, close the ImageWriter then open it again, after opened, close every window of Windows Explorer, then try to write the ISO again.
- In Windows XP or later, run this command using Run(WinKey+R, or in the Start Menu) or in a command prompt, to unmount the USB stick: mountvol driveletter: /dreplace the "
driveletter:" with your drive path like "E:". After unmount, the ImageWriter should work now. (You may unmount the drive before running ImageWriter.) - Use a partiton tool to delete the whole USB stick partition, to make the partition 'RAW'. (Note this will destory all you data on the USB stick and before you format it again, you won't be able to use it as usual.) After that, rerun the ImageWriter and try to write the ISO again. This isn't possible using Windows' Disk Management utility, but the DiskPart command can do this for removable media.
Troubleshooting
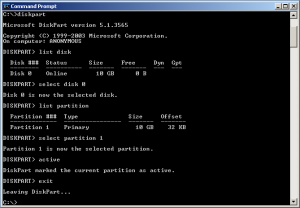
This situation would happen very rarely, but in the even that your computer doesn't boot from the LiveUSB/DVD from the steps above, you might try the following procedure.
C:\> diskpart
DISKPART> list disk           «--- print disks
DISKPART> select disk 0       «--- select disk number
DISKPART> list partition      «--- print partition table
DISKPART> select partition 1  «--- select the first partition
DISKPART> active              «--- activate disk/partition (bootable)
DISKPART> exit                «--- exit
Unlike fdisk, diskpart will preform changes as you enter them, therefore, there is no write instruction.


